{“@context”:”http://schema.org”,”@type”:”BreadcrumbList”,”@id”:”#Breadcrumb”,”itemListElement”:[{“@type”:”ListItem”,”position”:1,”item”:{“name”:”Home”,”@id”:”https://qunex.online/”}},{“@type”:”ListItem”,”position”:2,”item”:{“name”:”Summer Nails”,”@id”:”https://qunex.online/category/summer-nails/”}}]}
Are you ready to dive into the vibrant world of summer nail inspiration for 2024? Whether you’re planning to hit the beach or just enjoy the sunny vibes at local hangouts, having the perfect manicure can truly complete your look. This article will explore a range of summer nail designs, from the refreshingly simple to the stunningly elaborate. What kind of nail design captivates you? Is it the minimalist elegance of natural tones or the bold flair of baby blue? Read on to discover your next favorite summer nail trend!
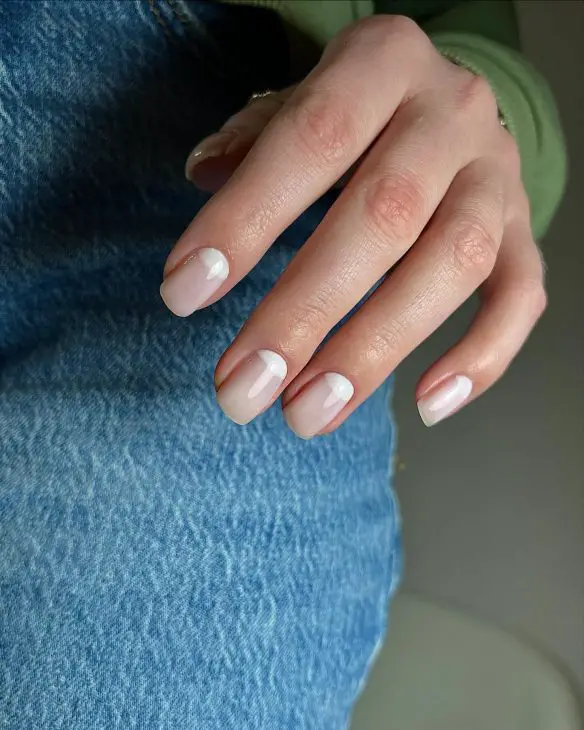
Fresh Elegance: The Quintessence of Summer
The sheer simplicity of this manicure embodies understated elegance with its milky white base and subtle pink hue blending seamlessly at the tips. A single diagonal stroke of white and pink on each nail adds a touch of sophistication, making this design a perfect choice for those who appreciate a minimalist aesthetic. This look is ideal for anyone seeking a simple, polished appearance without overpowering their summer ensemble.
Consumables for This Design:
- Base coat (Recommendation: OPI Natural Base Coat)
- Milky white polish (Recommendation: Essie Ballet Slippers)
- Soft pink polish (Recommendation: CND Shellac in Romantique)
- Top coat for a glossy finish (Recommendation: Seche Vite Dry Fast Top Coat)
- Striping tape for precise lines
DIY Instructions:
Start with a clean, prepped nail with a base coat to protect your nails. Apply two coats of milky white polish as the foundation. Once dry, use striping tape to create a diagonal guideline from the base to the tip of your nail on one side. Apply the soft pink polish, remove the tape while the polish is still wet, and let it dry. Finish with a glossy top coat to enhance the shine and durability of your manicure.
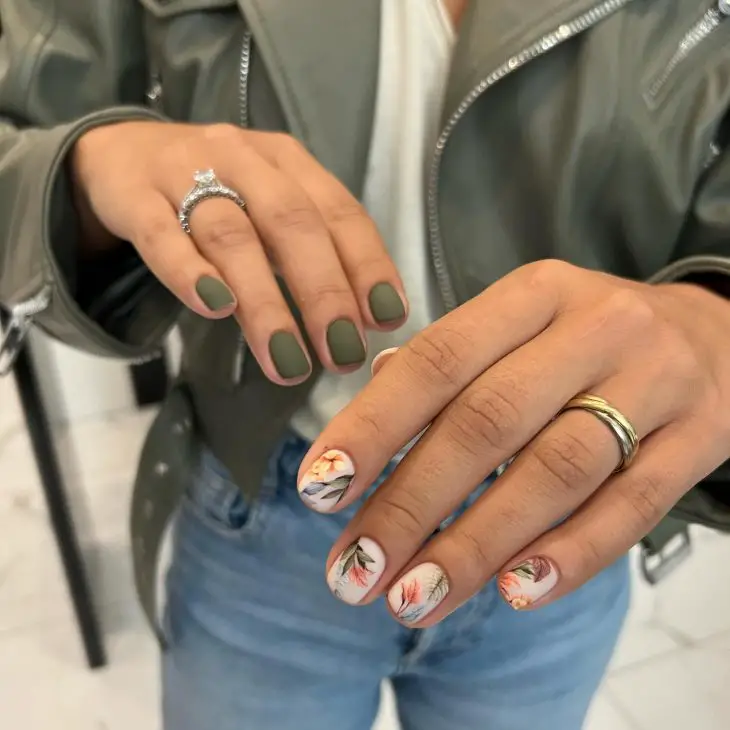
Earthy Green with Floral Artistry
This design features a rich, earthy green base that evokes the feeling of a lush summer garden. The accent nails are adorned with delicate floral patterns that provide a stark, beautiful contrast against the matte green. This design not only embraces summer nail inspiration acrylic but also incorporates elements of nature into everyday style, making it a unique choice for the season.
Consumables for This Design:
- Matte green polish (Recommendation: Zoya MatteVelvet in Loden)
- White polish for floral detailing (Recommendation: Sally Hansen White On)
- Detailing brush for intricate designs
- Matte top coat (Recommendation: Butter LONDON Matte Finish Shine Free Topcoat)
DIY Instructions:
After applying a base coat, coat your nails with two layers of the matte green polish. Using a detailing brush dipped in white polish, paint small floral designs on the accent nails. Allow the artwork to dry thoroughly before applying a matte top coat to preserve both the color and design.
/* <![CDATA[ */
fpm_start( "true" );
/* ]]> */
Swirling Sophistication: White Marble and Silver Glitter
This stunning manicure combines the timeless elegance of white marble with the dazzling touch of silver glitter. The swirling marble effect, paired with a bold silver glitter line at the tip, offers a luxurious look that’s perfect for both day and night during the summer months. It’s a sophisticated twist on the classic summer nail inspiration acrylic long.

Consumables for This Design:
- White marble-effect polish (Recommendation: Cirque Colors Marble Set)
- Silver glitter liner (Recommendation: Sally Hansen Diamond Strength No Chip Nail Color)
- A fine brush for detailed marble effects
- High-gloss top coat (Recommendation: Essie Gel Setter Top Coat)
DIY Instructions:
Apply a base coat to protect your nails. Use the white marble-effect polish to create the base design by swirling different shades with a fine brush. While the base is still tacky, carefully place a line of silver glitter along the tip of each nail using the glitter liner. Seal everything with a high-gloss top coat for a long-lasting finish.
Neon Nights: Bold Black with Neon Accents
This design brings a touch of edgy nightlife to your fingertips. A glossy black base sets the stage for vibrant neon outlines in shapes of hearts and abstract patterns, making it a standout choice for those who love to make a statement. This look not only capitalizes on the summer nail inspiration acrylic but also integrates the dramatic flair of neon colors, perfect for summer parties and night-outs.

Consumables for This Design:
- Black nail polish (Recommendation: Essie Licorice)
- Neon nail art pens in pink, blue, and orange (Recommendation: Sally Hansen Neon Nail Art Pens)
- Top coat for a glossy finish (Recommendation: Seche Vite Dry Fast Top Coat)
DIY Instructions:
Start with a clean nail and apply a black base coat. Once dry, use neon nail art pens to draw hearts and abstract designs on each nail. Allow your artwork to dry completely before sealing it with a glossy top coat to enhance the neon colors and ensure durability.
Summer Splash: Dynamic Pink French Tips
Elevate your summer style with these dynamic French tips, featuring a bold pink border on a soft white base. The addition of a glitter accent on one nail introduces a playful sparkle, perfect for sunny days. This design reflects a trendy take on the simple short French tip, ideal for those who prefer a splash of color with a classic touch.

Consumables for This Design:
- White nail polish (Recommendation: OPI Alpine Snow)
- Bright pink nail polish (Recommendation: China Glaze Hot Pink)
- Pink glitter polish (Recommendation: ORLY Miss Conduct)
- Clear top coat (Recommendation: Sally Hansen Mega Shine Top Coat)
DIY Instructions:
Apply a base coat followed by two coats of white polish. Once dry, carefully paint the tips of your nails with bright pink polish. For an added touch, apply pink glitter polish to one nail. Finish with a clear top coat to seal the design and add a glossy sheen.
Serene Skies: Blue Gradient with Cloud Design
These nails capture the essence of a serene summer sky with their soft blue gradient and delicate cloud designs. The subtle transition from light to darker blue creates a calming effect, making it a perfect summer nail inspiration acrylic almond style for those who enjoy thematic manicures reflecting natural beauty.

Consumables for This Design:
- Light blue nail polish (Recommendation: Essie Bikini So Teeny)
- Medium blue nail polish (Recommendation: Zoya Sailor)
- White nail polish for cloud details (Recommendation: Sally Hansen White On)
- Sponge for gradient effect
- Top coat for a smooth finish (Recommendation: Essie Gel Setter Top Coat)
DIY Instructions:
Begin with a light blue base, then use a sponge to apply a gradient of medium blue from the tip. Using a small brush, dab on white polish to create cloud effects. Seal with a top coat to enhance the smooth gradient and maintain the design’s freshness throughout the summer.
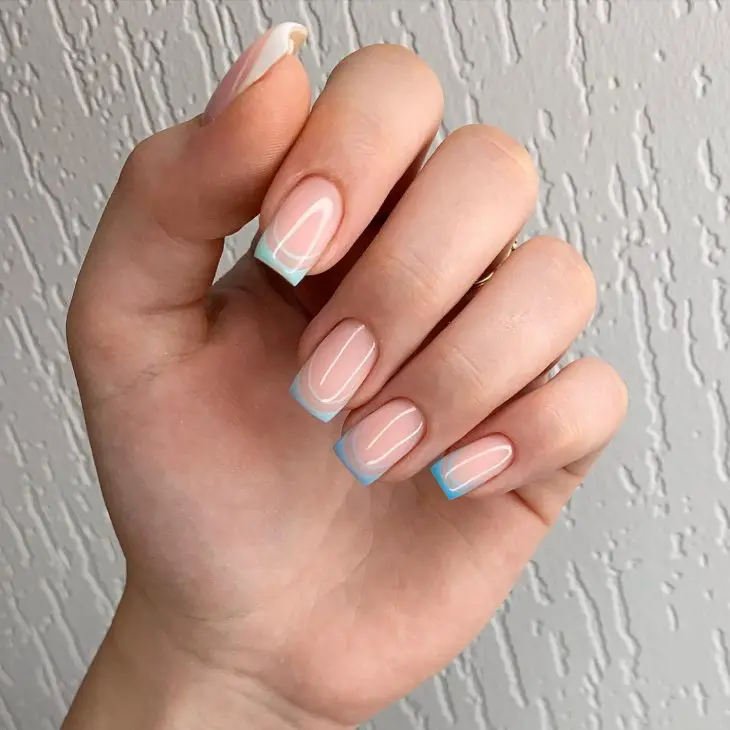
Almond Breeze: Delicate Pastel French with Line Art
This chic manicure combines pastel shades with precise line art for a sophisticated, airy summer look. Soft pink meets baby blue at the tips, highlighted by thin white lines for a polished finish. This style is an excellent example of summer nail inspiration simple almond, offering a fresh, minimalist aesthetic ideal for any summer occasion.
Consumables for This Design:
- Pastel pink nail polish (Recommendation: CND Shellac Rose Bud)
- Baby blue nail polish (Recommendation: OPI It’s a Boy!)
- White nail art liner (Recommendation: Kiss Nail Art Paint)
- Top coat for durability (Recommendation: INM Out The Door Top Coat)
DIY Instructions:
Apply a pastel pink base to all nails. Use baby blue polish to carefully paint the tips, then add thin white lines using a nail art liner to define and accentuate the design. Finish with a top coat to protect and enhance the nail art’s longevity and shine.
Subtle Elegance: Soft Pink with Metallic Charm
This design takes a soft approach with its gentle pink base and bold metallic stencils. The contrast between the soft pink and the striking silver of the stencils offers a fresh perspective on summer elegance. This look is a beautiful blend of classic femininity and modern artistry, perfect for those who appreciate subtle yet striking details.

Consumables for This Design:
- Soft pink polish (Recommendation: Essie Mademoiselle)
- Silver metallic polish (Recommendation: OPI Silver on Ice)
- Stencil stickers (Recommendation: Twinkled T Stencil Stickers)
- Top coat for a long-lasting glossy finish (Recommendation: Seche Vite Dry Fast Top Coat)
DIY Instructions:
Apply a base coat followed by two layers of soft pink polish. Once dry, position the stencil stickers on the nails and apply the silver metallic polish over the stencil. Carefully remove the stencil while the polish is still wet and let the design dry. Finish with a glossy top coat to seal in the design and add extra shine.
Futuristic Edge: Metallic Claws with Geometric Accents
This avant-garde design features long, sharp claws coated in a muted grey, topped with intricate silver metal embellishments. It’s perfect for those looking to make a bold statement or add an edgy, futuristic touch to their summer wardrobe.

Consumables for This Design:
- Grey polish (Recommendation: Zoya Dove)
- Silver metallic strips and embellishments (Recommendation: Born Pretty Nail Art Strips)
- Strong adhesive for embellishments (Recommendation: Nailene Ultra Quick Nail Glue)
- Top coat for protection and shine (Recommendation: INM Out the Door Top Coat)
DIY Instructions:
Paint your nails with two coats of grey polish. Once dry, apply the silver metallic strips and embellishments using a strong adhesive to ensure they stay in place. Finish with a strong top coat to protect both the color and the metallic details.
Cosmic Splendor: Galaxy-Inspired Art
Dive into the depths of the cosmos with these galaxy-inspired nails. Vibrant hues of purple and blue merge with a star-like shimmer, creating a look that’s truly out of this world. This manicure is ideal for those who love to carry a bit of the night sky with them.

Consumables for This Design:
- Base colors in purple and blue (Recommendation: Sally Hansen Miracle Gel in Tidal Wave and Purplexed)
- Sponge for dabbing effect
- Glitter polish for the starry effect (Recommendation: Essie Sparkle on Top)
- Top coat for a smooth, glossy finish (Recommendation: Revlon Extra Life No Chip Top Coat)
DIY Instructions:
Apply a dark base coat. Using a sponge, dab on purple and blue polish to create a blended, nebula-like effect. Add a light layer of glitter polish to mimic stars. Seal with a glossy top coat for a smooth finish and extra sparkle.
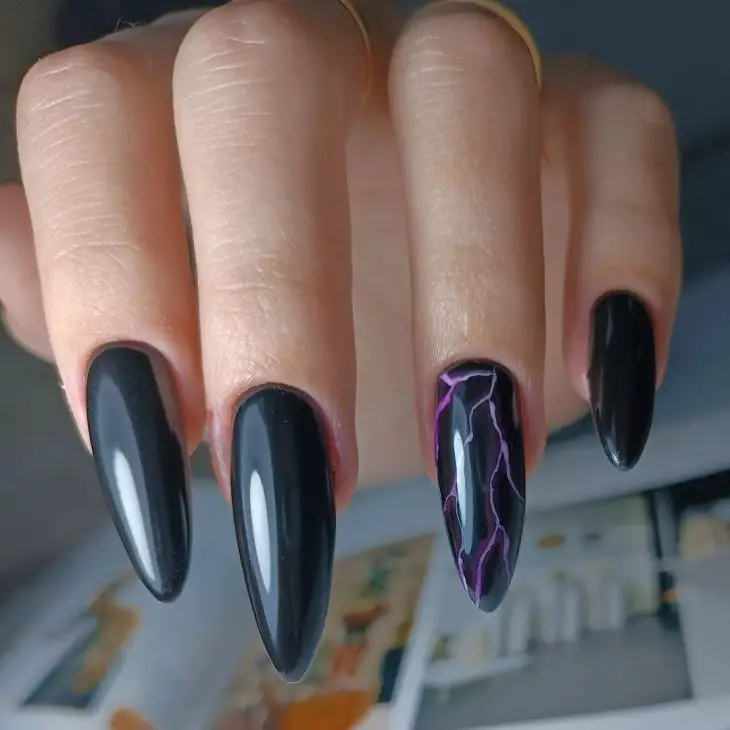
Sophisticated Nightlife: Black and Purple Lightning
Embrace the dark allure of the night with this bold design, featuring a sleek black base interrupted by electric purple lightning bolts. This manicure is perfect for evening events and anyone who wants to add a dramatic flair to their look.
Consumables for This Design:
- Black nail polish (Recommendation: Chanel Le Vernis in Noir)
- Purple lightning bolt stickers or freehand with a thin brush (Recommendation: Orly Instant Artist in Crisp White)
- Top coat for a flawless finish (Recommendation: OPI Top Coat)
DIY Instructions:
Start with a black base coat. Place purple lightning bolt stickers across each nail or use a thin brush to draw the designs freehand. Finish with a top coat to ensure the design lasts all night long.
Svelte Swirls: White Elegance with Burgundy Accents
This manicure showcases svelte, swirling lines in burgundy, gracefully tracing over a crisp white base. The fine lines evoke a sense of delicate artistry, perfect for those who seek a sophisticated yet understated style. It’s a refined choice for summer weddings or elegant evenings.

Consumables for This Design:
- White nail polish (Recommendation: Essie Blanc)
- Burgundy nail art liner (Recommendation: Sally Hansen Nail Art Pen in Red)
- Top coat for a smooth finish (Recommendation: Seche Vite Dry Fast Top Coat)
DIY Instructions:
Start with a base of white nail polish for a clean canvas. Once dry, use the burgundy nail art liner to draw thin, swirling designs across each nail. Steady hands are a must for this detailed work. Seal the design with a top coat to ensure longevity and enhance the colors’ vibrancy.
Forest Whispers: Deep Green with Gold Leaf
Embrace the essence of a lush forest with these deep green nails, accentuated with striking gold leaf details. This design speaks to nature lovers and those who prefer a touch of rustic luxury in their summer style. The metallic gold adds a luxurious contrast to the matte green, ideal for adventurous yet stylish outings.

Consumables for This Design:
- Deep green matte polish (Recommendation: Zoya Matte Velvet in Veruschka)
- Gold leaf sheets (Recommendation: Star Nail Art Gold Leaf)
- Tweezers for application
- Matte top coat for a protective finish (Recommendation: OPI Matte Top Coat)
DIY Instructions:
Apply two coats of the deep green matte polish as the base. Use tweezers to apply small pieces of gold leaf randomly or in a patterned design on the nails while the second coat is still slightly tacky. Finish with a matte top coat to seal in the gold leaf and maintain the matte appearance.
Lavender Luxury: Pastel Charm with Embellishments
This design features a soothing lavender base with elegant embellishments that include tiny beads and silver chains. It’s perfect for those who love a bit of sparkle and refinement in their nail art. This manicure is ideal for bridal showers or any festive summer occasion.

Consumables for This Design:
- Lavender polish (Recommendation: OPI Do You Lilac It?)
- Small silver beads and chains (Recommendation: Nail Art Decorative Charms)
- Clear polish to adhere embellishments (Recommendation: Essie Speed Setter)
- High-gloss top coat for a dazzling finish (Recommendation: Revlon Quick Dry Top Coat)
DIY Instructions:
Paint your nails with two coats of lavender polish. While the second coat is still wet, carefully place the silver beads and chains using a tweezer. Apply a drop of clear polish over the embellishments to secure them. Finish with a high-gloss top coat to protect your design and add an extra shine.
Delicate Blossom: Sheer Pink with Floral Appliqué
This ultra-feminine design features a sheer pink base adorned with a delicate white floral appliqué. It’s a dreamy choice for garden parties or simply embracing the floral trends of summer. This manicure combines simplicity with elegance, offering a breath of fresh air to any look.

Consumables for This Design:
- Sheer pink polish (Recommendation: Essie Sugar Daddy)
- White floral appliqués (Recommendation: Born Pretty Floral Nail Stickers)
- Small rhinestones for the center of flowers (Recommendation: Swarovski Tiny Crystals)
- Top coat for a seamless finish (Recommendation: Sally Hansen Advanced Hard as Nails)
DIY Instructions:
Apply two coats of sheer pink polish for a subtle hint of color. Place the white floral appliqués on the nails, ideally while the second coat is still tacky. Add a small rhinestone to the center of each flower for a touch of sparkle. Seal with a top coat to protect your delicate design and ensure longevity.
Nature’s Palette: Botanical Nail Art
This design captures the essence of a summer garden with its miniature botanical prints embedded in a clear polish base. Each nail features a different plant or flower, showcasing vibrant colors and intricate details—a perfect choice for anyone who wants to carry a piece of nature with them.
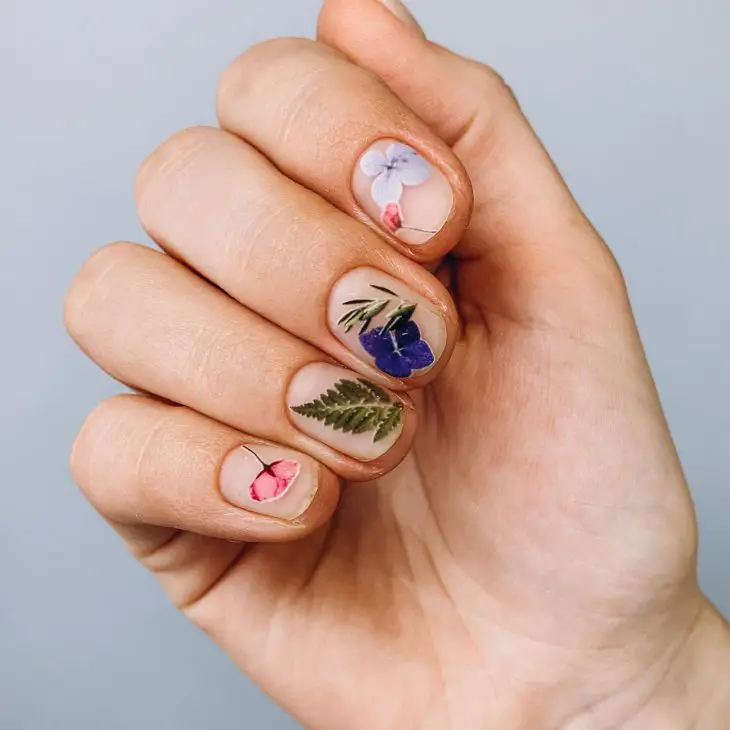
Consumables for This Design:
- Clear nail polish (Recommendation: OPI Clear Nail Polish)
- Real dried flowers and leaves (Recommendation: Miniature Botanicals for Nail Art)
- Tweezers for placement
- Top coat for a glossy finish (Recommendation: Essie Gel Setter Top Coat)
DIY Instructions:
Apply a clear nail polish as your base. Using tweezers, carefully place each dried flower or leaf onto the still-wet polish. Once set, apply another layer of clear polish to seal in the botanicals. Finish with a glossy top coat to enhance the natural beauty and ensure longevity.
Golden Gradient: Black and Gold Shimmer
This luxurious nail design features a smooth gradient from soft pink to rich black, accented with a sprinkle of golden glitter. It combines understated elegance with a touch of glam, perfect for evenings out or special occasions during the summer.
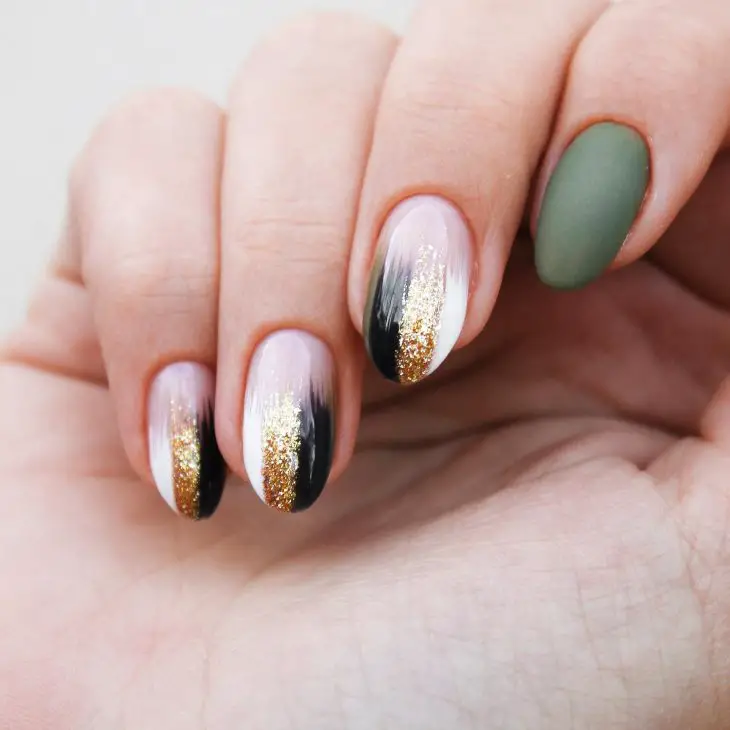
Consumables for This Design:
- Pink nail polish (Recommendation: Sally Hansen Pink Blink)
- Black nail polish (Recommendation: China Glaze Liquid Leather)
- Gold glitter polish (Recommendation: ORLY Glitz)
- Sponge for gradient effect
- Top coat for a seamless finish (Recommendation: Revlon Quick Dry Top Coat)
DIY Instructions:
Start with a base of pink nail polish. Once dry, use a sponge to apply a gradient effect with black polish from the tip downwards. While the gradient is still tacky, add a light sprinkle of gold glitter polish for a glamorous touch. Seal everything with a top coat for durability and shine.
Modern Artistry: Matte Gray with Organic Lines
Featuring a sophisticated matte gray background, this design is highlighted by organic lines in a contrasting tan shade, giving it a contemporary and artistic feel. This style is suited for those who prefer a minimalist yet bold aesthetic.

Consumables for This Design:
- Matte gray polish (Recommendation: Essie Matte About You)
- Tan nail art pen (Recommendation: Sally Hansen Nail Art Pen in Nude)
- Matte top coat (Recommendation: OPI Matte Top Coat)
DIY Instructions:
Paint your nails with two coats of matte gray polish. Use the tan nail art pen to draw freeform, organic lines on each nail, exploring different shapes and flows. Finish with a matte top coat to enhance the modern look and feel.
Spring Blossoms: Delicate Floral Design
This charming design features white blossoms on a clear base, adorned with tiny blue accents and golden centers. It’s an epitome of spring and summer vibes, ideal for picnics, daytime events, or just adding a floral touch to your everyday look.

Consumables for This Design:
- Clear nail polish (Recommendation: Seche Clear Base Coat)
- White nail polish for petals (Recommendation: Essie Blanc)
- Blue and gold nail art pens for detailing (Recommendation: Sally Hansen Nail Art Pens in Blue and Gold)
- Top coat for a protective finish (Recommendation: Seche Vite Dry Fast Top Coat)
DIY Instructions:
Apply a clear base coat. Use white polish to paint small blossoms on each nail, then detail with blue accents and a golden center using nail art pens. Allow each layer to dry before proceeding to the next to avoid smudging. Finish with a top coat to seal in the design and add a glossy look.
Vivid Dreams: Neon and Illustrative Art
This captivating design is a festival of color and creativity, combining neon orange tips with intricate illustrative art on a clear base. Each nail tells a different story with delicate sketches and motivational phrases like “Live the moment” and “Be free,” perfectly embodying a spirit of freedom and spontaneity. It’s an ideal choice for those who embrace bold statements and positivity in their summer adventures.

Consumables for This Design:
- Clear nail polish (Recommendation: OPI Natural Nail Base Coat)
- Neon orange polish (Recommendation: China Glaze Orange Knockout)
- Fine black liner for sketches (Recommendation: Sally Hansen Nail Art Pen in Black)
- White nail art pen for text (Recommendation: Sally Hansen Nail Art Pen in White)
- Top coat for a durable, glossy finish (Recommendation: Seche Vite Dry Fast Top Coat)
DIY Instructions:
Apply a clear base coat to prepare your nails. Once dry, apply neon orange polish on the tips using a sponge for a soft gradient effect. Using a fine liner, carefully draw the small sketches and write inspirational phrases on the clear sections of each nail. Once all art has dried, seal your design with a glossy top coat to enhance the colors and ensure your manicure lasts through all your summer fun.
Save Pin

{“@context”:”http://schema.org”,”@type”:”Article”,”dateCreated”:”2024-05-03T09:33:14+01:00″,”datePublished”:”2024-05-03T09:33:14+01:00″,”dateModified”:”2024-05-03T12:14:04+01:00″,”headline”:”Summer 2024 Nail Trends: 20 Creative Designs and How to Achieve Them”,”name”:”Summer 2024 Nail Trends: 20 Creative Designs and How to Achieve Them”,”keywords”:[],”url”:”https://qunex.online/summer-nail-trends-20-creative-designs-and-how-to-achieve-them/”,”description”:”Are you ready to dive into the vibrant world of summer nail inspiration for 2024? Whether you’re planning to hit the beach or just enjoy the sunny vibes at local hangouts, having the perfect manicure”,”copyrightYear”:”2024″,”articleSection”:”Summer Nails”,”articleBody”:”Are you ready to dive into the vibrant world of summer nail inspiration for 2024? Whether you’re planning to hit the beach or just enjoy the sunny vibes at local hangouts, having the perfect manicure can truly complete your look. This article will explore a range of summer nail designs, from the refreshingly simple to the stunningly elaborate. What kind of nail design captivates you? Is it the minimalist elegance of natural tones or the bold flair of baby blue? Read on to discover your next favorite summer nail trend!rnFresh Elegance: The Quintessence of SummerrnThe sheer simplicity of this manicure embodies understated elegance with its milky white base and subtle pink hue blending seamlessly at the tips. A single diagonal stroke of white and pink on each nail adds a touch of sophistication, making this design a perfect choice for those who appreciate a minimalist aesthetic. This look is ideal for anyone seeking a simple, polished appearance without overpowering their summer ensemble.rnrnrnrnConsumables for This Design:rnrn tBase coat (Recommendation: OPI Natural Base Coat)rn tMilky white polish (Recommendation: Essie Ballet Slippers)rn tSoft pink polish (Recommendation: CND Shellac in Romantique)rn tTop coat for a glossy finish (Recommendation: Seche Vite Dry Fast Top Coat)rn tStriping tape for precise linesrnrnDIY Instructions:rnrnStart with a clean, prepped nail with a base coat to protect your nails. Apply two coats of milky white polish as the foundation. Once dry, use striping tape to create a diagonal guideline from the base to the tip of your nail on one side. Apply the soft pink polish, remove the tape while the polish is still wet, and let it dry. Finish with a glossy top coat to enhance the shine and durability of your manicure.rnEarthy Green with Floral ArtistryrnThis design features a rich, earthy green base that evokes the feeling of a lush summer garden. The accent nails are adorned with delicate floral patterns that provide a stark, beautiful contrast against the matte green. This design not only embraces summer nail inspiration acrylic but also incorporates elements of nature into everyday style, making it a unique choice for the season.rnrnrnrnConsumables for This Design:rnrn tMatte green polish (Recommendation: Zoya MatteVelvet in Loden)rn tWhite polish for floral detailing (Recommendation: Sally Hansen White On)rn tDetailing brush for intricate designsrn tMatte top coat (Recommendation: Butter LONDON Matte Finish Shine Free Topcoat)rnrnDIY Instructions:rnrnAfter applying a base coat, coat your nails with two layers of the matte green polish. Using a detailing brush dipped in white polish, paint small floral designs on the accent nails. Allow the artwork to dry thoroughly before applying a matte top coat to preserve both the color and design.rnSwirling Sophistication: White Marble and Silver GlitterrnThis stunning manicure combines the timeless elegance of white marble with the dazzling touch of silver glitter. The swirling marble effect, paired with a bold silver glitter line at the tip, offers a luxurious look thatu2019s perfect for both day and night during the summer months. Itu2019s a sophisticated twist on the classic summer nail inspiration acrylic long.rnrnrnrnConsumables for This Design:rnrn tWhite marble-effect polish (Recommendation: Cirque Colors Marble Set)rn tSilver glitter liner (Recommendation: Sally Hansen Diamond Strength No Chip Nail Color)rn tA fine brush for detailed marble effectsrn tHigh-gloss top coat (Recommendation: Essie Gel Setter Top Coat)rnrnDIY Instructions:rnrnApply a base coat to protect your nails. Use the white marble-effect polish to create the base design by swirling different shades with a fine brush. While the base is still tacky, carefully place a line of silver glitter along the tip of each nail using the glitter liner. Seal everything with a high-gloss top coat for a long-lasting finish.rnNeon Nights: Bold Black with Neon AccentsrnThis design brings a touch of edgy nightlife to your fingertips. A glossy black base sets the stage for vibrant neon outlines in shapes of hearts and abstract patterns, making it a standout choice for those who love to make a statement. This look not only capitalizes on the summer nail inspiration acrylic but also integrates the dramatic flair of neon colors, perfect for summer parties and night-outs.rnrnrnrnConsumables for This Design:rnrn tBlack nail polish (Recommendation: Essie Licorice)rn tNeon nail art pens in pink, blue, and orange (Recommendation: Sally Hansen Neon Nail Art Pens)rn tTop coat for a glossy finish (Recommendation: Seche Vite Dry Fast Top Coat)rnrnDIY Instructions:rnrnStart with a clean nail and apply a black base coat. Once dry, use neon nail art pens to draw hearts and abstract designs on each nail. Allow your artwork to dry completely before sealing it with a glossy top coat to enhance the neon colors and ensure durability.rnSummer Splash: Dynamic Pink French TipsrnElevate your summer style with these dynamic French tips, featuring a bold pink border on a soft white base. The addition of a glitter accent on one nail introduces a playful sparkle, perfect for sunny days. This design reflects a trendy take on the simple short French tip, ideal for those who prefer a splash of color with a classic touch.rnrnrnrnConsumables for This Design:rnrn tWhite nail polish (Recommendation: OPI Alpine Snow)rn tBright pink nail polish (Recommendation: China Glaze Hot Pink)rn tPink glitter polish (Recommendation: ORLY Miss Conduct)rn tClear top coat (Recommendation: Sally Hansen Mega Shine Top Coat)rnrnDIY Instructions:rnrnApply a base coat followed by two coats of white polish. Once dry, carefully paint the tips of your nails with bright pink polish. For an added touch, apply pink glitter polish to one nail. Finish with a clear top coat to seal the design and add a glossy sheen.rnSerene Skies: Blue Gradient with Cloud DesignrnThese nails capture the essence of a serene summer sky with their soft blue gradient and delicate cloud designs. The subtle transition from light to darker blue creates a calming effect, making it a perfect summer nail inspiration acrylic almond style for those who enjoy thematic manicures reflecting natural beauty.rnrnrnrnConsumables for This Design:rnrn tLight blue nail polish (Recommendation: Essie Bikini So Teeny)rn tMedium blue nail polish (Recommendation: Zoya Sailor)rn tWhite nail polish for cloud details (Recommendation: Sally Hansen White On)rn tSponge for gradient effectrn tTop coat for a smooth finish (Recommendation: Essie Gel Setter Top Coat)rnrnDIY Instructions:rnrnBegin with a light blue base, then use a sponge to apply a gradient of medium blue from the tip. Using a small brush, dab on white polish to create cloud effects. Seal with a top coat to enhance the smooth gradient and maintain the designu2019s freshness throughout the summer.rnAlmond Breeze: Delicate Pastel French with Line ArtrnThis chic manicure combines pastel shades with precise line art for a sophisticated, airy summer look. Soft pink meets baby blue at the tips, highlighted by thin white lines for a polished finish. This style is an excellent example of summer nail inspiration simple almond, offering a fresh, minimalist aesthetic ideal for any summer occasion.rnrnrnrnConsumables for This Design:rnrn tPastel pink nail polish (Recommendation: CND Shellac Rose Bud)rn tBaby blue nail polish (Recommendation: OPI Itu2019s a Boy!)rn tWhite nail art liner (Recommendation: Kiss Nail Art Paint)rn tTop coat for durability (Recommendation: INM Out The Door Top Coat)rnrnDIY Instructions:rnrnApply a pastel pink base to all nails. Use baby blue polish to carefully paint the tips, then add thin white lines using a nail art liner to define and accentuate the design. Finish with a top coat to protect and enhance the nail artu2019s longevity and shine.rnSubtle Elegance: Soft Pink with Metallic CharmrnThis design takes a soft approach with its gentle pink base and bold metallic stencils. The contrast between the soft pink and the striking silver of the stencils offers a fresh perspective on summer elegance. This look is a beautiful blend of classic femininity and modern artistry, perfect for those who appreciate subtle yet striking details.rnrnrnrnConsumables for This Design:rnrn tSoft pink polish (Recommendation: Essie Mademoiselle)rn tSilver metallic polish (Recommendation: OPI Silver on Ice)rn tStencil stickers (Recommendation: Twinkled T Stencil Stickers)rn tTop coat for a long-lasting glossy finish (Recommendation: Seche Vite Dry Fast Top Coat)rnrnDIY Instructions:rnrnApply a base coat followed by two layers of soft pink polish. Once dry, position the stencil stickers on the nails and apply the silver metallic polish over the stencil. Carefully remove the stencil while the polish is still wet and let the design dry. Finish with a glossy top coat to seal in the design and add extra shine.rnFuturistic Edge: Metallic Claws with Geometric AccentsrnThis avant-garde design features long, sharp claws coated in a muted grey, topped with intricate silver metal embellishments. Itu2019s perfect for those looking to make a bold statement or add an edgy, futuristic touch to their summer wardrobe.rnrnrnrnConsumables for This Design:rnrn tGrey polish (Recommendation: Zoya Dove)rn tSilver metallic strips and embellishments (Recommendation: Born Pretty Nail Art Strips)rn tStrong adhesive for embellishments (Recommendation: Nailene Ultra Quick Nail Glue)rn tTop coat for protection and shine (Recommendation: INM Out the Door Top Coat)rnrnDIY Instructions:rnrnPaint your nails with two coats of grey polish. Once dry, apply the silver metallic strips and embellishments using a strong adhesive to ensure they stay in place. Finish with a strong top coat to protect both the color and the metallic details.rnCosmic Splendor: Galaxy-Inspired ArtrnDive into the depths of the cosmos with these galaxy-inspired nails. Vibrant hues of purple and blue merge with a star-like shimmer, creating a look thatu2019s truly out of this world. This manicure is ideal for those who love to carry a bit of the night sky with them.rnrnrnrnConsumables for This Design:rnrn tBase colors in purple and blue (Recommendation: Sally Hansen Miracle Gel in Tidal Wave and Purplexed)rn tSponge for dabbing effectrn tGlitter polish for the starry effect (Recommendation: Essie Sparkle on Top)rn tTop coat for a smooth, glossy finish (Recommendation: Revlon Extra Life No Chip Top Coat)rnrnDIY Instructions:rnrnApply a dark base coat. Using a sponge, dab on purple and blue polish to create a blended, nebula-like effect. Add a light layer of glitter polish to mimic stars. Seal with a glossy top coat for a smooth finish and extra sparkle.rnSophisticated Nightlife: Black and Purple LightningrnEmbrace the dark allure of the night with this bold design, featuring a sleek black base interrupted by electric purple lightning bolts. This manicure is perfect for evening events and anyone who wants to add a dramatic flair to their look.rnrnrnrnConsumables for This Design:rnrn tBlack nail polish (Recommendation: Chanel Le Vernis in Noir)rn tPurple lightning bolt stickers or freehand with a thin brush (Recommendation: Orly Instant Artist in Crisp White)rn tTop coat for a flawless finish (Recommendation: OPI Top Coat)rnrnDIY Instructions:rnrnStart with a black base coat. Place purple lightning bolt stickers across each nail or use a thin brush to draw the designs freehand. Finish with a top coat to ensure the design lasts all night long.rnSvelte Swirls: White Elegance with Burgundy AccentsrnThis manicure showcases svelte, swirling lines in burgundy, gracefully tracing over a crisp white base. The fine lines evoke a sense of delicate artistry, perfect for those who seek a sophisticated yet understated style. It’s a refined choice for summer weddings or elegant evenings.rnrnrnrnConsumables for This Design:rnrn tWhite nail polish (Recommendation: Essie Blanc)rn tBurgundy nail art liner (Recommendation: Sally Hansen Nail Art Pen in Red)rn tTop coat for a smooth finish (Recommendation: Seche Vite Dry Fast Top Coat)rnrnDIY Instructions:rnrnStart with a base of white nail polish for a clean canvas. Once dry, use the burgundy nail art liner to draw thin, swirling designs across each nail. Steady hands are a must for this detailed work. Seal the design with a top coat to ensure longevity and enhance the colors’ vibrancy.rnForest Whispers: Deep Green with Gold LeafrnEmbrace the essence of a lush forest with these deep green nails, accentuated with striking gold leaf details. This design speaks to nature lovers and those who prefer a touch of rustic luxury in their summer style. The metallic gold adds a luxurious contrast to the matte green, ideal for adventurous yet stylish outings.rnrnrnrnConsumables for This Design:rnrn tDeep green matte polish (Recommendation: Zoya Matte Velvet in Veruschka)rn tGold leaf sheets (Recommendation: Star Nail Art Gold Leaf)rn tTweezers for applicationrn tMatte top coat for a protective finish (Recommendation: OPI Matte Top Coat)rnrnDIY Instructions:rnrnApply two coats of the deep green matte polish as the base. Use tweezers to apply small pieces of gold leaf randomly or in a patterned design on the nails while the second coat is still slightly tacky. Finish with a matte top coat to seal in the gold leaf and maintain the matte appearance.rnLavender Luxury: Pastel Charm with EmbellishmentsrnThis design features a soothing lavender base with elegant embellishments that include tiny beads and silver chains. It’s perfect for those who love a bit of sparkle and refinement in their nail art. This manicure is ideal for bridal showers or any festive summer occasion.rnrnrnrnConsumables for This Design:rnrn tLavender polish (Recommendation: OPI Do You Lilac It?)rn tSmall silver beads and chains (Recommendation: Nail Art Decorative Charms)rn tClear polish to adhere embellishments (Recommendation: Essie Speed Setter)rn tHigh-gloss top coat for a dazzling finish (Recommendation: Revlon Quick Dry Top Coat)rnrnDIY Instructions:rnrnPaint your nails with two coats of lavender polish. While the second coat is still wet, carefully place the silver beads and chains using a tweezer. Apply a drop of clear polish over the embellishments to secure them. Finish with a high-gloss top coat to protect your design and add an extra shine.rnDelicate Blossom: Sheer Pink with Floral Appliquu00e9rnThis ultra-feminine design features a sheer pink base adorned with a delicate white floral appliquu00e9. Itu2019s a dreamy choice for garden parties or simply embracing the floral trends of summer. This manicure combines simplicity with elegance, offering a breath of fresh air to any look.rnrnrnrnConsumables for This Design:rnrn tSheer pink polish (Recommendation: Essie Sugar Daddy)rn tWhite floral appliquu00e9s (Recommendation: Born Pretty Floral Nail Stickers)rn tSmall rhinestones for the center of flowers (Recommendation: Swarovski Tiny Crystals)rn tTop coat for a seamless finish (Recommendation: Sally Hansen Advanced Hard as Nails)rnrnDIY Instructions:rnrnApply two coats of sheer pink polish for a subtle hint of color. Place the white floral appliquu00e9s on the nails, ideally while the second coat is still tacky. Add a small rhinestone to the center of each flower for a touch of sparkle. Seal with a top coat to protect your delicate design and ensure longevity.rnNature’s Palette: Botanical Nail ArtrnThis design captures the essence of a summer garden with its miniature botanical prints embedded in a clear polish base. Each nail features a different plant or flower, showcasing vibrant colors and intricate detailsu2014a perfect choice for anyone who wants to carry a piece of nature with them.rnrnrnrnConsumables for This Design:rnrn tClear nail polish (Recommendation: OPI Clear Nail Polish)rn tReal dried flowers and leaves (Recommendation: Miniature Botanicals for Nail Art)rn tTweezers for placementrn tTop coat for a glossy finish (Recommendation: Essie Gel Setter Top Coat)rnrnDIY Instructions:rnrnApply a clear nail polish as your base. Using tweezers, carefully place each dried flower or leaf onto the still-wet polish. Once set, apply another layer of clear polish to seal in the botanicals. Finish with a glossy top coat to enhance the natural beauty and ensure longevity.rnGolden Gradient: Black and Gold ShimmerrnThis luxurious nail design features a smooth gradient from soft pink to rich black, accented with a sprinkle of golden glitter. It combines understated elegance with a touch of glam, perfect for evenings out or special occasions during the summer.rnrnrnrnConsumables for This Design:rnrn tPink nail polish (Recommendation: Sally Hansen Pink Blink)rn tBlack nail polish (Recommendation: China Glaze Liquid Leather)rn tGold glitter polish (Recommendation: ORLY Glitz)rn tSponge for gradient effectrn tTop coat for a seamless finish (Recommendation: Revlon Quick Dry Top Coat)rnrnDIY Instructions:rnrnStart with a base of pink nail polish. Once dry, use a sponge to apply a gradient effect with black polish from the tip downwards. While the gradient is still tacky, add a light sprinkle of gold glitter polish for a glamorous touch. Seal everything with a top coat for durability and shine.rnModern Artistry: Matte Gray with Organic LinesrnFeaturing a sophisticated matte gray background, this design is highlighted by organic lines in a contrasting tan shade, giving it a contemporary and artistic feel. This style is suited for those who prefer a minimalist yet bold aesthetic.rnrnrnrnConsumables for This Design:rnrn tMatte gray polish (Recommendation: Essie Matte About You)rn tTan nail art pen (Recommendation: Sally Hansen Nail Art Pen in Nude)rn tMatte top coat (Recommendation: OPI Matte Top Coat)rnrnDIY Instructions:rnrnPaint your nails with two coats of matte gray polish. Use the tan nail art pen to draw freeform, organic lines on each nail, exploring different shapes and flows. Finish with a matte top coat to enhance the modern look and feel.rnSpring Blossoms: Delicate Floral DesignrnThis charming design features white blossoms on a clear base, adorned with tiny blue accents and golden centers. It’s an epitome of spring and summer vibes, ideal for picnics, daytime events, or just adding a floral touch to your everyday look.rnrnrnrnConsumables for This Design:rnrn tClear nail polish (Recommendation: Seche Clear Base Coat)rn tWhite nail polish for petals (Recommendation: Essie Blanc)rn tBlue and gold nail art pens for detailing (Recommendation: Sally Hansen Nail Art Pens in Blue and Gold)rn tTop coat for a protective finish (Recommendation: Seche Vite Dry Fast Top Coat)rnrnDIY Instructions:rnrnApply a clear base coat. Use white polish to paint small blossoms on each nail, then detail with blue accents and a golden center using nail art pens. Allow each layer to dry before proceeding to the next to avoid smudging. Finish with a top coat to seal in the design and add a glossy look.rnVivid Dreams: Neon and Illustrative ArtrnThis captivating design is a festival of color and creativity, combining neon orange tips with intricate illustrative art on a clear base. Each nail tells a different story with delicate sketches and motivational phrases like “Live the moment” and “Be free,” perfectly embodying a spirit of freedom and spontaneity. It’s an ideal choice for those who embrace bold statements and positivity in their summer adventures.rnrnrnrnConsumables for This Design:rnrn tClear nail polish (Recommendation: OPI Natural Nail Base Coat)rn tNeon orange polish (Recommendation: China Glaze Orange Knockout)rn tFine black liner for sketches (Recommendation: Sally Hansen Nail Art Pen in Black)rn tWhite nail art pen for text (Recommendation: Sally Hansen Nail Art Pen in White)rn tTop coat for a durable, glossy finish (Recommendation: Seche Vite Dry Fast Top Coat)rnrnDIY Instructions:rnrnApply a clear base coat to prepare your nails. Once dry, apply neon orange polish on the tips using a sponge for a soft gradient effect. Using a fine liner, carefully draw the small sketches and write inspirational phrases on the clear sections of each nail. Once all art has dried, seal your design with a glossy top coat to enhance the colors and ensure your manicure lasts through all your summer fun.rnrnrnSave Pinrnrnrn”,”publisher”:{“@id”:”#Publisher”,”@type”:”Organization”,”name”:”Fall Update 2024″,”logo”:{“@type”:”ImageObject”,”url”:”https://qunex.online/wp-content/uploads/2024/04/doluchaysya-do-nas-v-google-news-46.png”}},”sourceOrganization”:{“@id”:”#Publisher”},”copyrightHolder”:{“@id”:”#Publisher”},”mainEntityOfPage”:{“@type”:”WebPage”,”@id”:”https://qunex.online/summer-nail-trends-20-creative-designs-and-how-to-achieve-them/”,”breadcrumb”:{“@id”:”#Breadcrumb”}},”author”:{“@type”:”Person”,”name”:”Anna”,”url”:”https://qunex.online/author/qunex_online/”},”image”:{“@type”:”ImageObject”,”url”:”https://qunex.online/wp-content/uploads/2024/05/spring-kopiya-kopiya-kopiya-kopiya-1000-x-2000-piks-6.jpg”,”width”:1200,”height”:2000}}