A spoonful of buttery cookie crumbs, fluffy cheesecake filling, and a smooth layer of cookie butter makes a small dessert feel like a special occasion. These no-bake Biscoff cheesecake cups deliver all three, with no oven, water bath, or slicing required.
The flavor is rich and gently spiced, with the tang of cream cheese balancing the sweetness of the cookies and spread. Clear glasses show off the layers, but small jars, ramekins, and dessert cups work just as well.
They also fit neatly around a busy schedule. Assemble the cups the day before, let the refrigerator do the setting, and add the crunchy decorations shortly before serving. Whether you are planning a family dinner, a birthday buffet, or a relaxed evening with friends, dessert can already be waiting.
Recipe at a glance
Yield: 6 generous dessert cups Cup size: Approximately 200–240 ml each, with room for toppings Preparation: About 25 minutes Chilling: At least 4 hours; overnight is convenient Total time: About 4 hours 25 minutes Cooking: None; only brief warming to melt butter and loosen the topping Texture: Soft, creamy, and spoonable Equipment: Mixing bowls, electric mixer, spatula, kitchen scale, and 6 serving cups
What Makes These Cheesecake Cups So Convenient?
A full cheesecake needs enough structure to stand on a plate and cut into neat slices. Cheesecake cups have a different job: they need to hold attractive layers and taste delicious from a spoon.
That makes individual portions especially forgiving. There is no springform pan to line, no delicate transfer to a cake stand, and no first slice to wrestle out of the tin.
This version uses whipped cream to lighten a cream cheese and cookie butter filling. It contains no added eggs or gelatin. The filling firms as it chills, while the biscuit base remains easy to scoop.
Good to know
This recipe is designed for serving in cups. The filling is not intended to be unmolded or used as a freestanding cheesecake without further testing and adjustments.
What Is Biscoff Spread?
Biscoff spread is a sweet cookie butter with a caramelized biscuit flavor and a gentle spice note. It gives the filling its distinctive taste and creates an easy topping when slightly warmed.
For this recipe, use smooth Biscoff spread in the filling and topping. Crunchy spread can be enjoyable, but it changes the texture and is harder to pipe neatly.
The matching biscuits form the base and add a crisp finish. Because cookie weights vary, measure by weight rather than relying on a fixed number of biscuits.
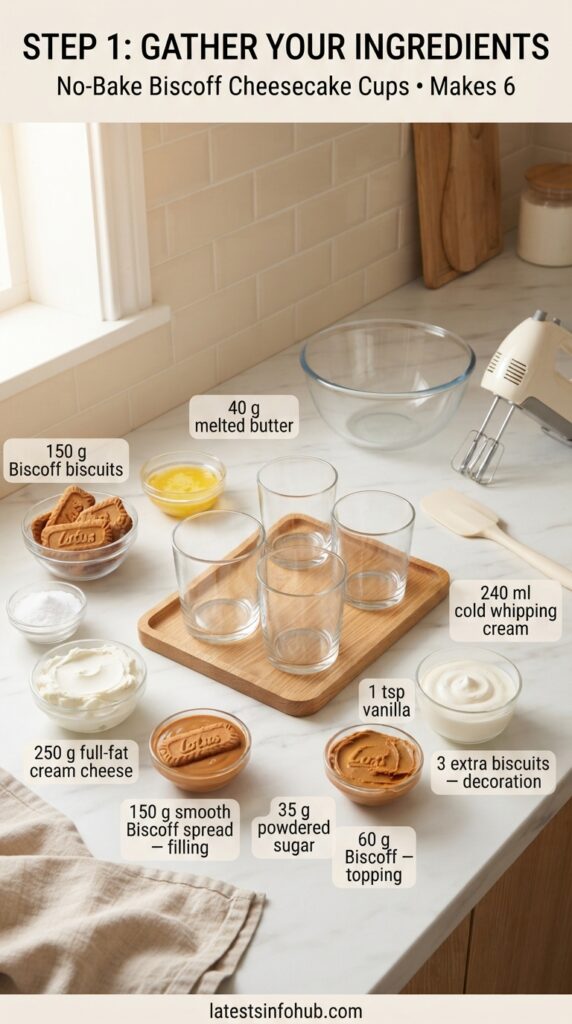
Ingredients
For the cookie base
150 g Biscoff biscuits
40 g unsalted butter, melted and cooled until just warm
A small pinch of fine salt, optional
For the cheesecake filling
250 g full-fat plain cream cheese, softened until easy to beat but still cool
150 g smooth Biscoff spread, at room temperature
35 g powdered sugar, sifted
1 teaspoon vanilla extract
240 ml cold heavy whipping cream, preferably 35–36% fat or higher
For the topping
60 g smooth Biscoff spread
3 additional Biscoff biscuits, broken into halves, or extra cookie crumbs
Optional decorations
A little freshly whipped cream
Dark chocolate shavings
A very light pinch of flaky salt
Measurement note: Weight measurements are the most reliable for the cookies, cream cheese, sugar, and spread. The cream quantity is 1 cup using a 240 ml cup.
Allergen note: This recipe contains dairy and wheat when made with standard Biscoff biscuits and spread. Check all current package labels for additional allergens and cross-contact information. Do not assume cookie butter is suitable for every nut allergy simply because it is not nut butter.
Ingredient Choices That Matter
Use full-fat cream cheese
Firm, full-fat cream cheese gives the filling its body. A block-style product is a useful choice where available.
Some regions mainly sell cream cheese in tubs. Choose a thick, full-fat plain variety rather than a whipped or very soft sandwich spread. Different products can produce a softer filling, which matters less in cups than in a sliced cheesecake.
Keep the cream cold
The cream should be cold when whipped. The cream cheese, by contrast, needs to be soft enough to beat smoothly. Treating these two ingredients differently helps avoid a lumpy or loose filling.
Use powdered sugar
Powdered sugar blends in readily. Granulated sugar may leave a gritty texture because there is no cooking stage to help dissolve it.
The amount here is deliberately modest: the cookie butter, base, and topping already bring sweetness.
Let the butter cool slightly
Very hot melted butter is unnecessary for the crumb base. Let it cool until just warm, then mix it with the cookies.
Pro tip: Prepare the serving space first
Put the cups on a small tray that fits in your refrigerator before assembling them. Moving one tray is easier than balancing six filled glasses individually.
How to Make No-Bake Biscoff Cheesecake Cups
Step 1: Make the cookie crumbs
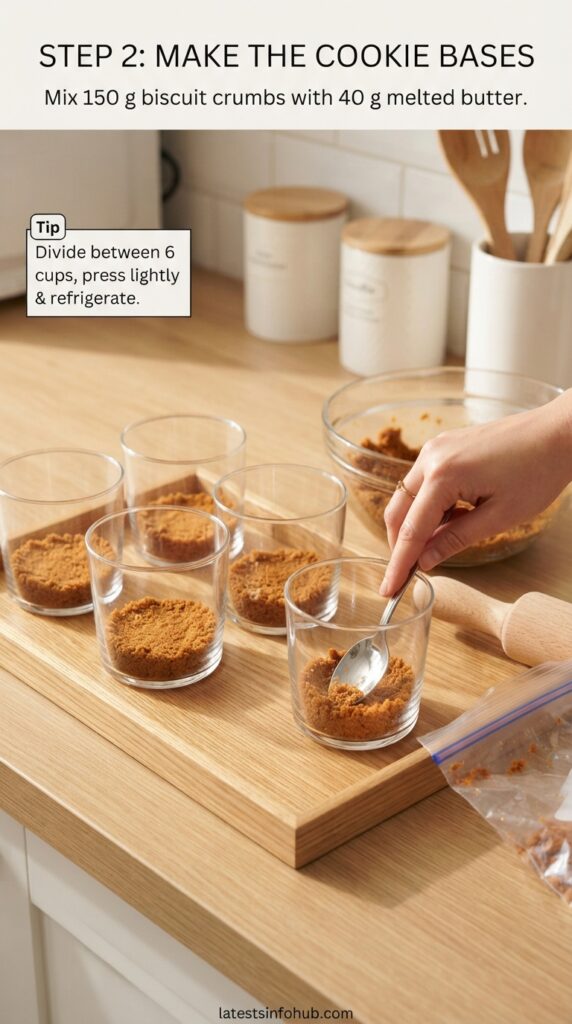
Crush the 150 g biscuits in a food processor, or place them in a sturdy food bag and crush with a rolling pin.
Aim for mostly fine crumbs with a little texture. Large chunks make the base uneven and can be awkward to eat from a narrow cup.
Mix with the melted butter and optional salt until the crumbs look evenly moistened.
Step 2: Divide the base between the cups
Divide the crumb mixture evenly among six cups—about 31–32 g per cup.
Press lightly with the back of a spoon to make a level layer. You want the crumbs to hold together gently, not form a hard slab.
Refrigerate the cups while you make the filling.
Avoid the rock-hard base
Cheesecake cups are eaten with a spoon. Light pressure is enough; firmly packing the crumbs as you would for a sliceable crust can make them difficult to scoop.
Step 3: Beat the cream cheese mixture
Place the softened cream cheese in a mixing bowl. Beat briefly on medium-low speed until smooth, scraping down the bowl as needed.
Add the 150 g Biscoff spread, powdered sugar, and vanilla. Beat just until the mixture is evenly colored and free of visible cream cheese lumps.
Do not keep beating once it is smooth. The aim is an even mixture, not extra volume at this stage.
Step 4: Whip the cream separately
In a second bowl, whip the cold cream on medium speed until it forms firm peaks.
Lift the whisk to check: the peak should hold its shape, and the cream should look smooth rather than grainy. Stop before it becomes clumpy.
If your kitchen is warm, chilling the bowl and beaters beforehand can help.
Step 5: Fold the filling together
Stir about one-third of the whipped cream into the cream cheese mixture to loosen it.
Add the remaining whipped cream in two portions. Fold gently with a spatula, scraping down the side of the bowl, lifting from the bottom, and turning the mixture over itself.
Stop when no white streaks remain. The filling should be thick enough to mound softly on a spoon.
Pro tip: Fold after whipping
Switching back to the electric mixer at this point can knock air out of the filling. A spatula gives you better control.
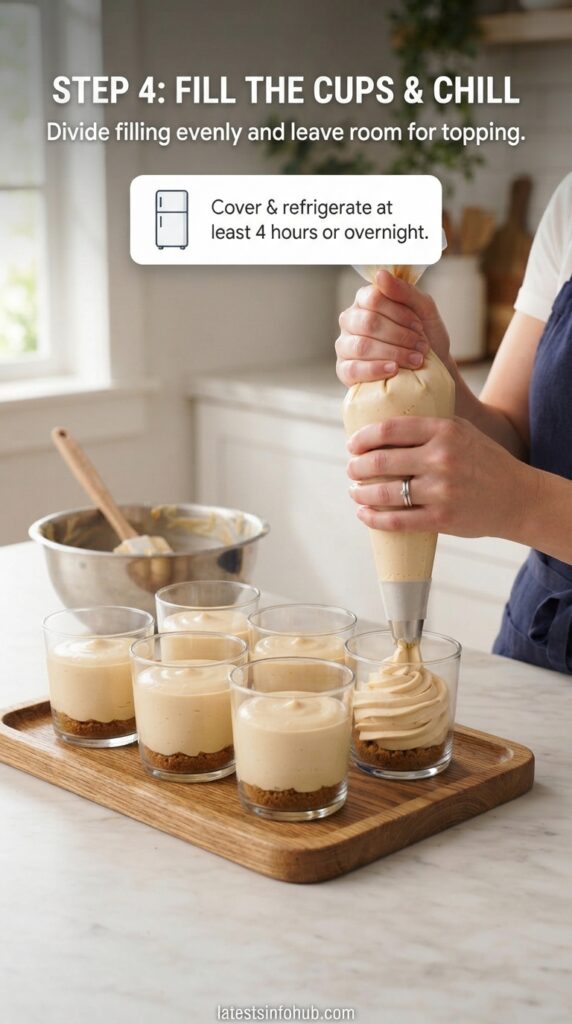
Step 6: Fill and chill
Spoon the filling over the chilled crumb bases, dividing it evenly. Alternatively, transfer the filling to a piping bag with a wide opening and pipe it into the cups.
Smooth the tops and leave a little space for the cookie butter topping.
Cover and refrigerate for at least 4 hours, preferably overnight. Chilling helps the filling firm and allows the layers to settle.
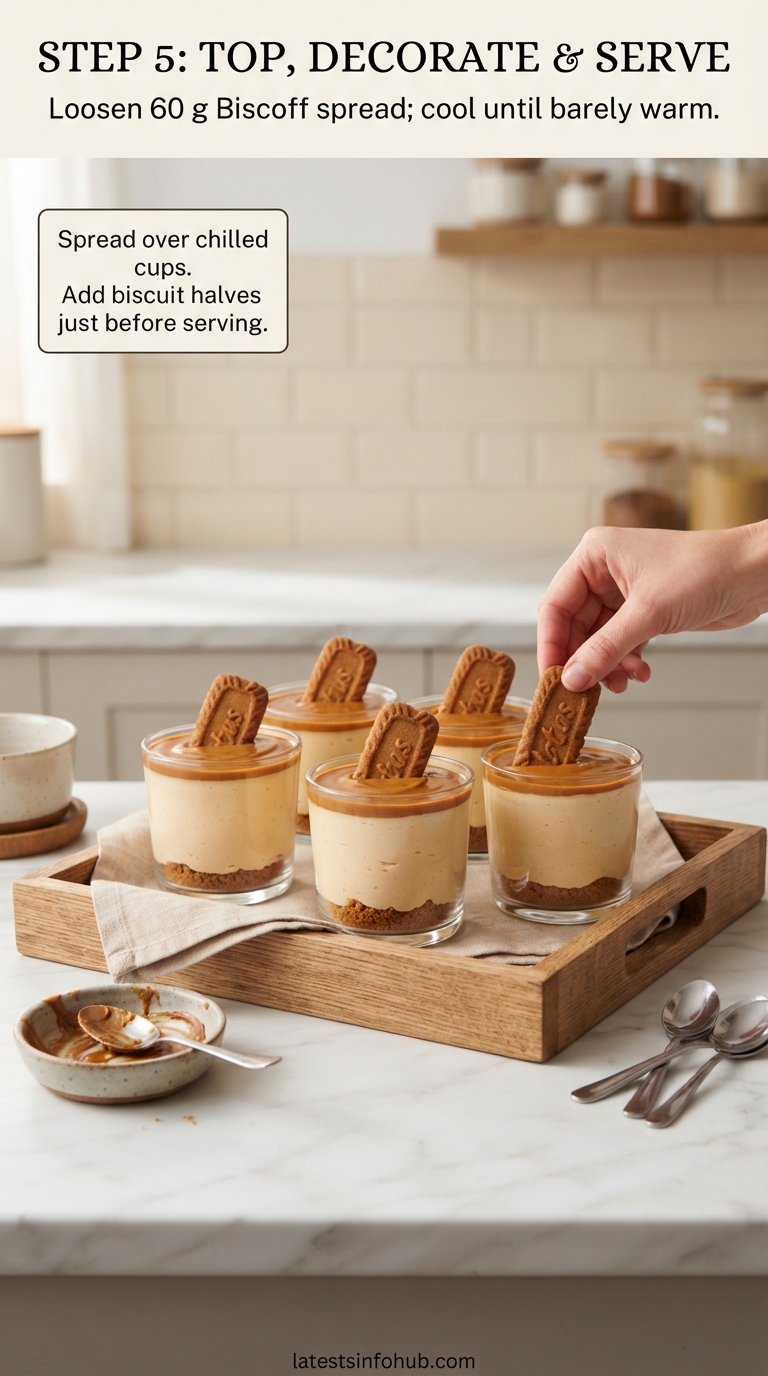
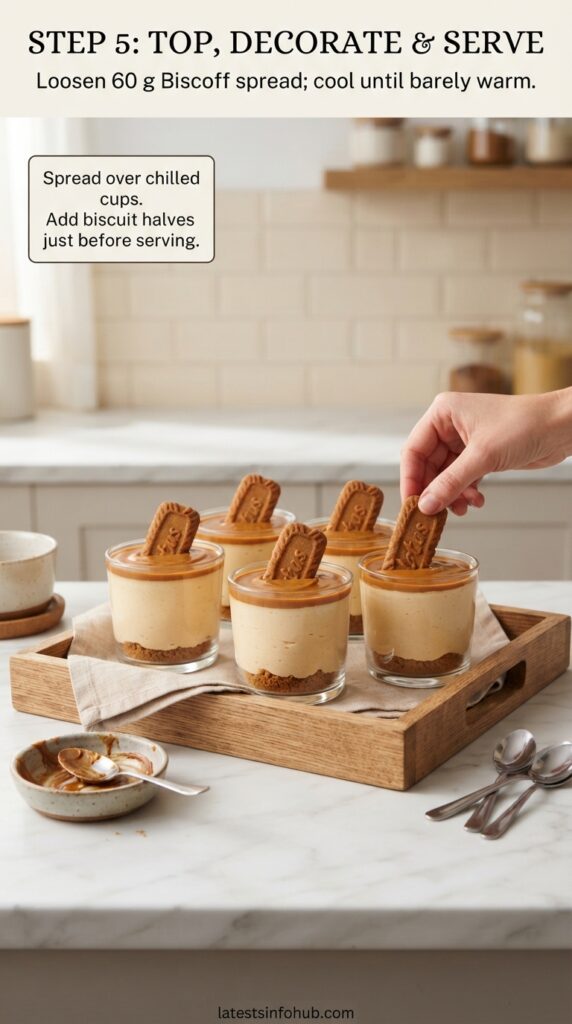
Step 7: Add the cookie butter topping
Put the remaining 60 g Biscoff spread in a microwave-safe bowl. Warm in very short bursts, about 5 seconds at a time, stirring between bursts, just until it flows.
Let it cool until barely warm. It should be pourable but not hot.
Divide over the chilled cups, using about 10 g per cup. Tilt each cup gently or spread with the back of a spoon to make a thin layer.
Return to the refrigerator for 10–15 minutes if needed to firm the topping slightly.
Step 8: Decorate and serve
Just before serving, add a biscuit half or a few fresh crumbs to each cup. Add optional whipped cream or chocolate shavings if desired.
Serve chilled with small spoons, encouraging a scoop that reaches all three layers.
How to Get Clean, Attractive Layers
Clear, straight-sided cups are useful because the crumb base, pale filling, and golden topping remain visible.
To keep the presentation neat, fill the cups from the center rather than smearing the mixture around the rim. A piping bag helps, but a spoon works perfectly well if you take your time.
Wipe any marks from the rim before chilling. Keep the topping thin enough that it complements the filling instead of overwhelming it.
For a party, matching cup sizes make portioning easier. For a family dinner, a mix of small glasses and ramekins can look just as inviting.
Presentation tip
Add the upright cookie at the last moment. A biscuit left in contact with the filling overnight will soften, even when the dessert is properly refrigerated.
A Simple Make-Ahead Schedule
When
What to do
The day before
Prepare the crumb bases and filling, assemble, cover, and refrigerate.
After the cups have set
Add the cooled, loosened cookie butter topping. Cover and refrigerate again.
Shortly before serving
Add fresh crumbs, cookie halves, or optional whipped cream.
At serving time
Bring out only the portions you need and keep the rest chilled.
You can assemble the base and filling up to 2 days ahead when using fresh ingredients and keeping everything properly refrigerated. For the freshest texture, the day before serving is a practical choice.
The base gradually softens as it sits beneath the filling. That is expected and does not mean the recipe has gone wrong; fresh crumbs on top provide the contrasting crunch.
Troubleshooting Common Problems
My filling has cream cheese lumps
The cream cheese was probably too cold, or it was not smoothed out before the other ingredients were added.
If you notice lumps before folding in the whipped cream, continue beating the cream cheese mixture briefly while scraping the bowl. Once the whipped cream is folded in, vigorous beating is more likely to deflate the filling than improve it.
My filling seems too soft
Possible causes include a very soft cream cheese, underwhipped cream, warm ingredients, or excessive mixing after folding.
Refrigerate the assembled cups overnight before judging the final texture. Because this is a spoon dessert, it does not need to become firm enough to slice.
If it remains almost liquid, chilling alone may not fix it. For the next batch, use firmer cream cheese and make sure the cream holds peaks before folding.
My cream became grainy
It may be overwhipped. If it is only slightly grainy, gently whisk in a small splash of fresh cold cream by hand, then reassess.
If the cream has separated into butter-like clumps and liquid, start again for the filling.
My topping melted into the filling
The spread was probably too hot, or the filling had not chilled long enough. Let the cups set first, and cool the warmed spread until barely warm before adding it.
My crumb base is difficult to scoop
The crumbs may have been pressed too firmly. Use lighter pressure next time. The butter quantity is designed for a spoonable base, so avoid adding extra butter without checking the texture.
My cups taste too sweet
Keep the topping thin and avoid adding caramel sauce or other sweet decorations. For your next batch, reduce the powdered sugar slightly; the cookie butter itself will still provide considerable sweetness.
A few dark chocolate shavings can add contrast, though they do not remove the sugar already in the dessert.
Easy Flavor Variations
Chocolate Biscoff cups
Sprinkle a little finely shaved dark chocolate over the finished cups. This adds a contrasting flavor without changing the filling’s structure.
Coffee Biscoff cups
Dissolve ½–1 teaspoon instant espresso powder in 1 teaspoon hot water. Cool completely, then mix into the cream cheese mixture before folding in the whipped cream.
Use the smaller amount first for a subtle coffee note.
Berry-topped cups
Add a few thoroughly dried raspberries or sliced strawberries shortly before serving. Avoid mixing wet fruit into the filling, as released juice can loosen it.
Smaller party portions
Divide the same batch among approximately 10–12 small cups, depending on their size. Use thinner layers and retain the full chilling time.
A simpler topping
Skip the extra spread and finish with cookie crumbs. You still get Biscoff flavor from the base and filling, with a less rich finish.
Substitution note: Other cookie butter brands may work, but their sweetness, thickness, and ingredients vary. Replacing both the cream cheese and whipping cream with dairy-free alternatives requires more adjustment; these products do not all whip or set in the same way.
Storage and Serving Guidance
Keep the cups covered in the refrigerator at 40°F (4°C) or below. Plan to enjoy them within 3 days of preparation, using fresh dairy ingredients and following any shorter package guidance.
These are perishable dairy desserts. Limit their total time out of refrigeration to 2 hours, or 1 hour if the temperature is above 90°F (32°C). Preparation, decorating, transport, and serving time all count. FoodSafety.gov refrigeration guidance
For transport, use an insulated cooler with ice packs and keep the cups upright. Refrigerate them promptly on arrival.
Can you freeze them?
Freezing is possible, but the filling can lose some of its airy texture after thawing. For an event where appearance matters, refrigerating the cups a day ahead is the more predictable option.
If freezing, use freezer-safe containers, leave off the fresh whipped cream and biscuit decorations, and cover well. Plan to use within about a month for quality. Thaw in the refrigerator, then add fresh toppings. Avoid freezing in ordinary drinking glasses unless the manufacturer identifies them as freezer-safe.
For a dessert buffet
Put out a small batch and replenish from the refrigerator. This keeps later servings cold and helps the filling retain its texture.
Frequently Asked Questions
Do I need gelatin?
No. This recipe uses cream cheese, cookie butter, whipped cream, and refrigeration to create a soft-set filling. The cups provide the support, so a sliceable set is unnecessary.
Can I use light cream cheese?
It may produce a looser filling. Full-fat cream cheese is the more dependable choice for the texture described here.
Can I use milk instead of whipping cream?
No. Milk will not whip and will make the filling thinner. Use a cream labeled as suitable for whipping.
Can I make the cups without an electric mixer?
Yes, but whipping cream by hand takes effort. Use a large chilled bowl and whisk, then beat the softened cream cheese mixture thoroughly in a separate bowl before combining.
Can I use crunchy Biscoff spread?
Yes, if you enjoy small cookie pieces in the filling. Smooth spread is easier for neat piping and a level topping.
Can I make one large cheesecake with this recipe?
It is better used as a spoon dessert in a serving dish than as an unmolded cake. A full cheesecake needs suitable pan dimensions, a stronger structure, and its own tested chilling instructions.
Is this dessert egg-free?
There are no added eggs in the recipe. For an egg allergy, check the labels of every packaged ingredient, including cookies, spread, and decorations, for ingredients and cross-contact warnings.
Is the recipe gluten-free?
No. Standard Biscoff biscuits and spread contain wheat. Both would need suitable gluten-free replacements, with all other ingredients checked as well.
Why add decorations at the end?
Cookie pieces absorb moisture from the filling and refrigerator environment. Adding them shortly before serving preserves the crisp contrast that makes each spoonful more interesting.
With the cups chilled and waiting, the finishing touches take only a few minutes. Add the cookies, set out the spoons, and enjoy a dessert that brings plenty of flavor without taking over the rest of your day.